# 테스트 개요
AWS의 Code Pipeline을 사용하면 서비스 배포 파이프라인을 생성 하여 사용 할 수 있다. AWS에서 제공하는 예제로 따라 해보았다. 기록으로 남겨 둔다.
# 준비사항
테스트 하려면 일단 github 계정과 ECS클러스터는 생성 되어 있어야 한다.
코드작성 및 배포용 Server도 필요한데 개인 PC로 해도 된다.
1. Github Repository 생성
깃헙을 사용 하기 위해 먼저 github cli인 gh를 설치 한다.
### 리눅스 ###
sudo dnf install 'dnf-command(config-manager)' -y
sudo dnf config-manager --add-repo https://cli.github.com/packages/rpm/gh-cli.repo
sudo dnf install gh --repo gh-cli -y

### Windows 10 이상 ###
winget install --id GitHub.cli
깃헙으로 로그인 합니다.
gh auth login

PS D:\> gh auth login
? Where do you use GitHub? GitHub.com
? What is your preferred protocol for Git operations on this host? HTTPS
? Authenticate Git with your GitHub credentials? Yes
? How would you like to authenticate GitHub CLI? Login with a web browser

! First copy your one-time code: D6BF-FEF0
Press Enter to open https://github.com/login/device in your browser...
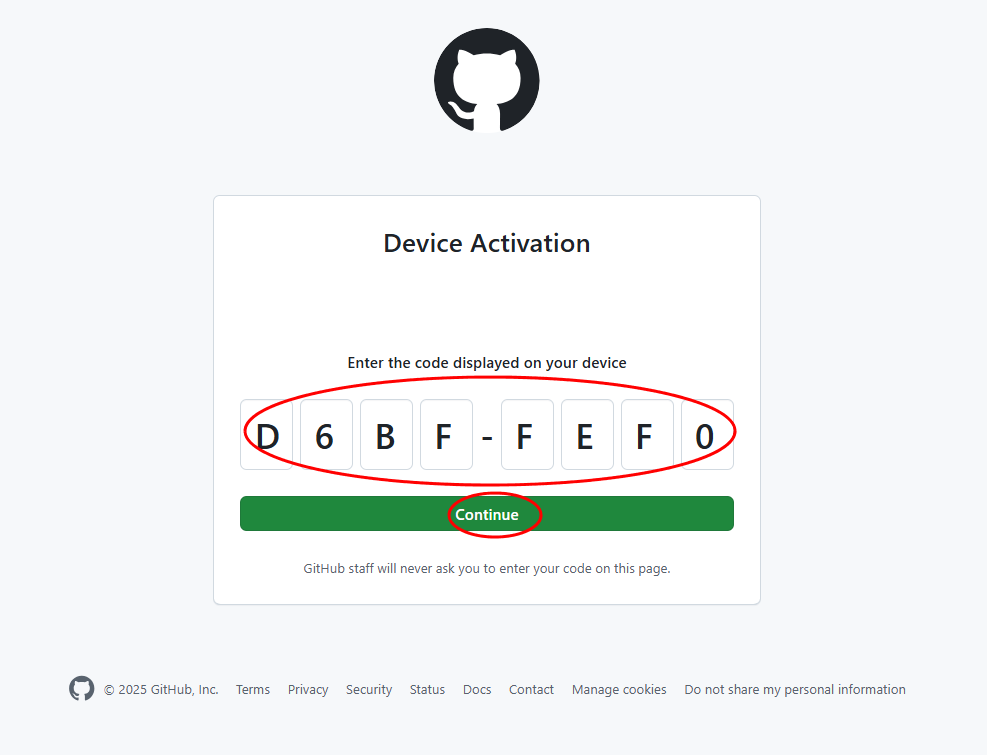
✓ Authentication complete.
- gh config set -h github.com git_protocol https
✓ Configured git protocol
✓ Logged in as user000
PS D:\>
웹브라우저를 통해 아래와 같이 인증이 되었다.
2. git repository 생성
gh repo create teenieping --private3. git 동기화를 위해 디렉토리 생성 해서 clone 실행
cd
git clone https://github.com/<your_github_id>/teenieping

(실행결과)
Cloning into 'teenieping'...
warning: You appear to have cloned an empty repository.
4. 해당 디렉토리에 기존에 소스들을 copy한 후 repository에 push
cd teeniping
cp ~/teenieping/* ./
git add .
git commit -m "initial commit"
git push

PS D:\Admin\git\ecs\teenieping> git add .
warning: LF will be replaced by CRLF in Dockerfile.
The file will have its original line endings in your working directory
warning: LF will be replaced by CRLF in default.conf.
The file will have its original line endings in your working directory
warning: LF will be replaced by CRLF in index.html.
The file will have its original line endings in your working directory
PS D:\Admin\git\ecs\teenieping> git commit -m "initial commit"
[main (root-commit) a4e0463] initial commit
 3 files changed, 73 insertions(+)
 create mode 100644 Dockerfile
 create mode 100644 default.conf
 create mode 100644 index.html
PS D:\Admin\git\ecs\teenieping> git push
Enumerating objects: 5, done.
Counting objects: 100% (5/5), done.
Delta compression using up to 8 threads
Compressing objects: 100% (5/5), done.
Writing objects: 100% (5/5), 1.23 KiB | 419.00 KiB/s, done.
Total 5 (delta 0), reused 0 (delta 0), pack-reused 0
To https://github.com/[your-github-id]/teenieping
 * [new branch]      main -> main
(확인결과)
5. 해당 디렉토리에 buildspec.yml 파일을 생성 하고 아래 코드를 작성합니다.
pre_build에 3변수 및 post_build부분에 서비스명을 작성해 준다.
- export AWS_REGION="<YOUR REGION>"
- export AWS_ACCOUNT_ID="<YOUR ACCOUNT ID>"
- export IMAGE_REPO_NAME="teeniping"
- printf '[{"name":"teeniping","imageUri":"%s"}]' $REPOSITORY_URI:$IMAGE_TAG > imagedefinitions.json
version: 0.2

phases:
  pre_build:
    commands:
      - echo Logging in to Amazon ECR...
      - export AWS_REGION="<YOUR REGION>"
      - export AWS_ACCOUNT_ID="<YOUR ACCOUNT ID>"
      - export IMAGE_REPO_NAME="teeniping"
      - aws --version
      - aws ecr get-login-password --region $AWS_REGION | docker login --username AWS --password-stdin $AWS_ACCOUNT_ID.dkr.ecr.$AWS_REGION.amazonaws.com
      - export REPOSITORY_URI=$AWS_ACCOUNT_ID.dkr.ecr.$AWS_REGION.amazonaws.com/$IMAGE_REPO_NAME
      - export COMMIT_HASH=$(echo $CODEBUILD_RESOLVED_SOURCE_VERSION | cut -c 1-7)
      - export IMAGE_TAG=${COMMIT_HASH:=latest}
  build:
    commands:
      - echo Build started on `date`
      - echo Building the Docker image...
      - docker build -t $REPOSITORY_URI:latest .
      - docker tag $REPOSITORY_URI:latest $REPOSITORY_URI:$IMAGE_TAG
  post_build:
    commands:
      - echo Build completed on `date`
      - echo Pushing the Docker images...
      - docker push $REPOSITORY_URI:latest
      - docker push $REPOSITORY_URI:$IMAGE_TAG
      - echo Writing image definitions file...
      - printf '[{"name":"teeniping","imageUri":"%s"}]' $REPOSITORY_URI:$IMAGE_TAG > imagedefinitions.json
artifacts:
    files: imagedefinitions.json
6. git에 파일 추가후 push 한다.
git add .
git commit -m "buildspec.yml add"
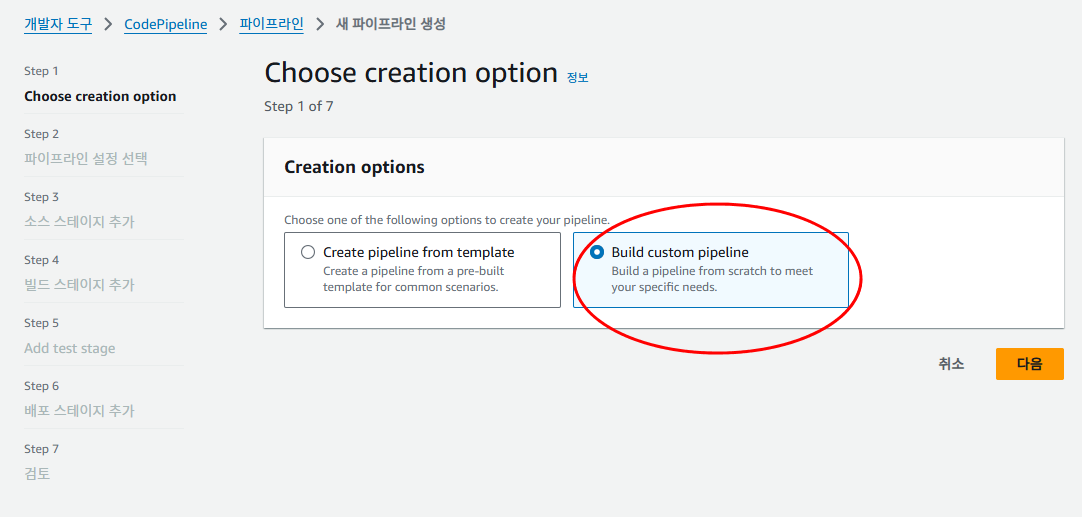
git push7. Code Pipeline 메뉴로 이동 해서 파이프 라인 생성 버튼을 누릅니다.
https://ap-northeast-2.console.aws.amazon.com/codesuite/codepipeline/home
https://ap-northeast-2.console.aws.amazon.com/codesuite/codepipeline/home
ap-northeast-2.console.aws.amazon.com

8. Build custom pipeline을 선택합니다.
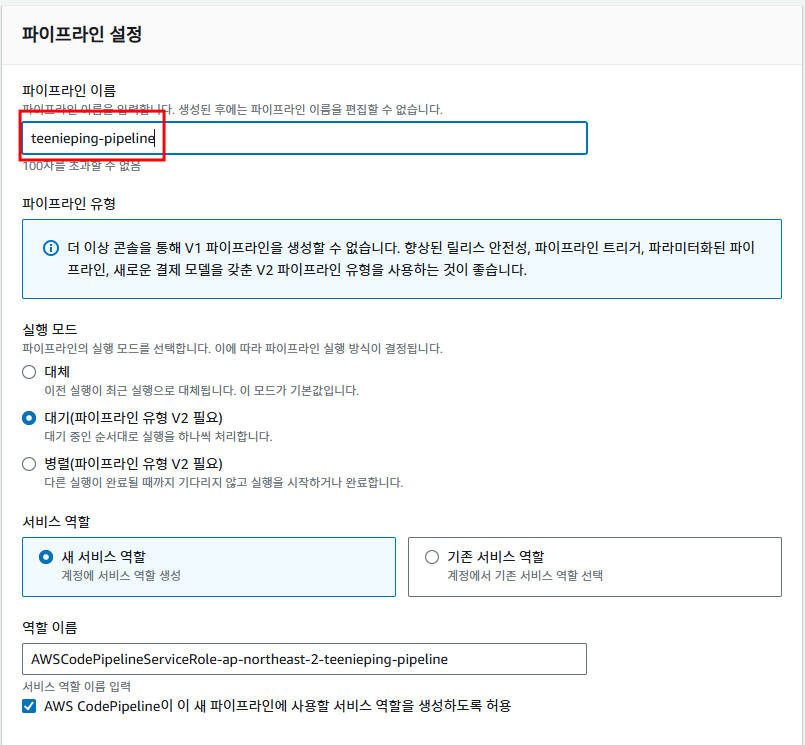
9. 파이프라인 이름을 입력하고 넘어갑니다.
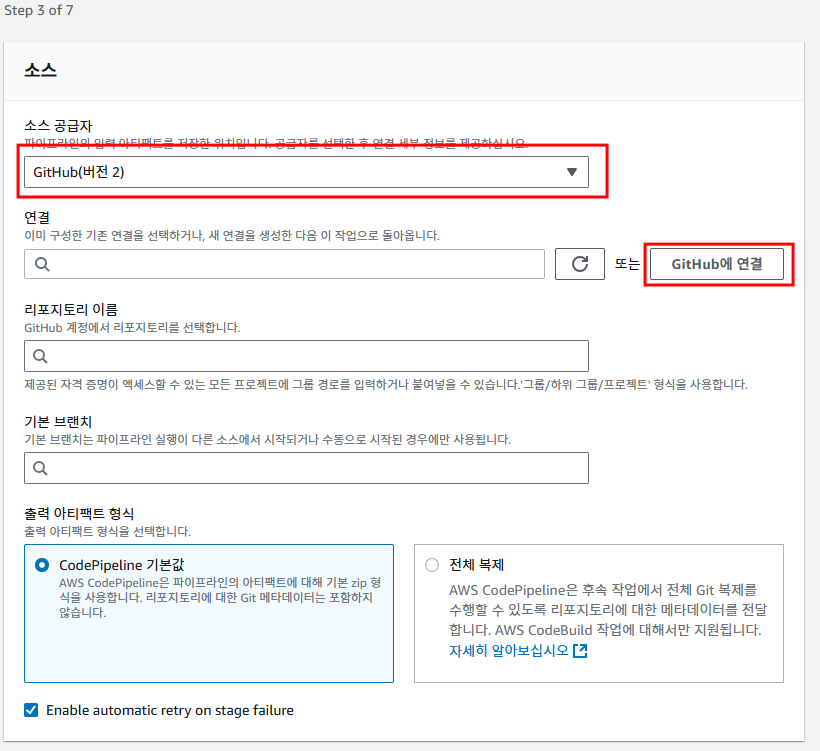
10. GitHub(버전2)를 선택하고 GitHub에 연결 버튼을 누릅니다.
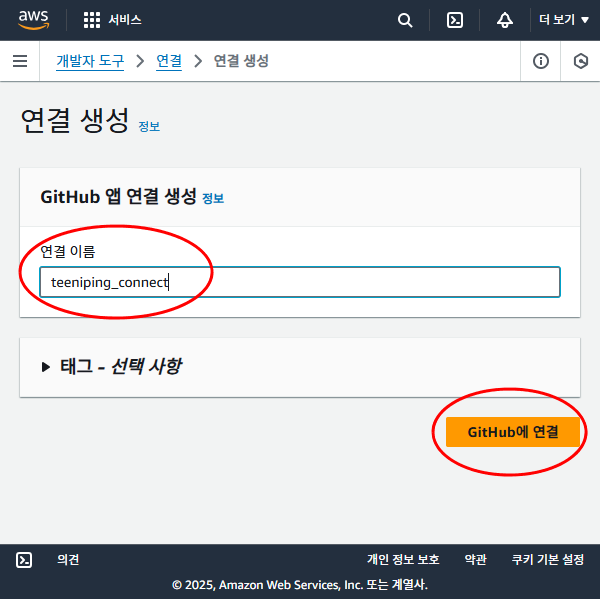
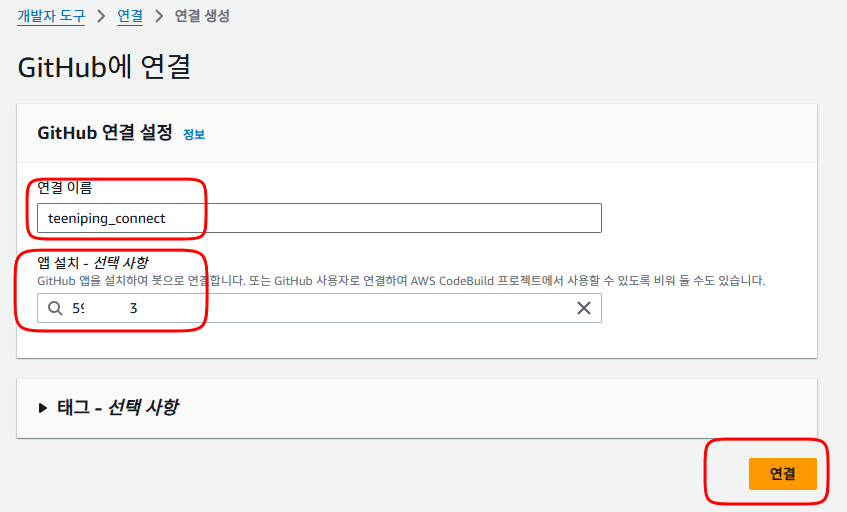
11. 새창이 뜨면 연결이름을 입력하고 GitHub에 연결 버튼을 누릅니다.
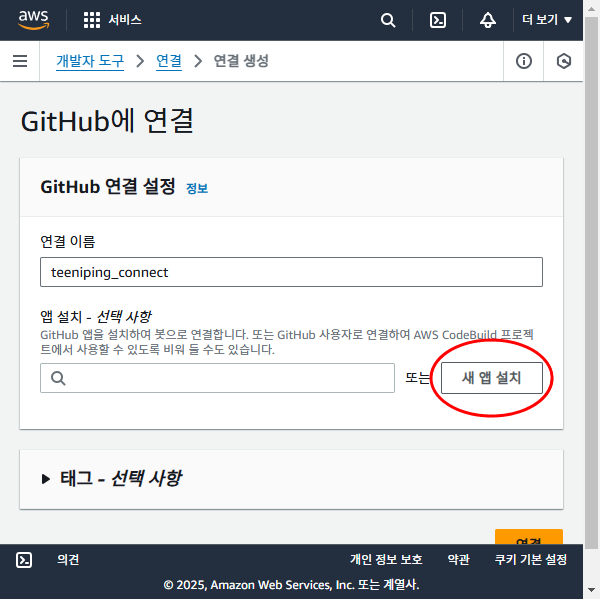
12. 새 앱 설치를 누릅니다.
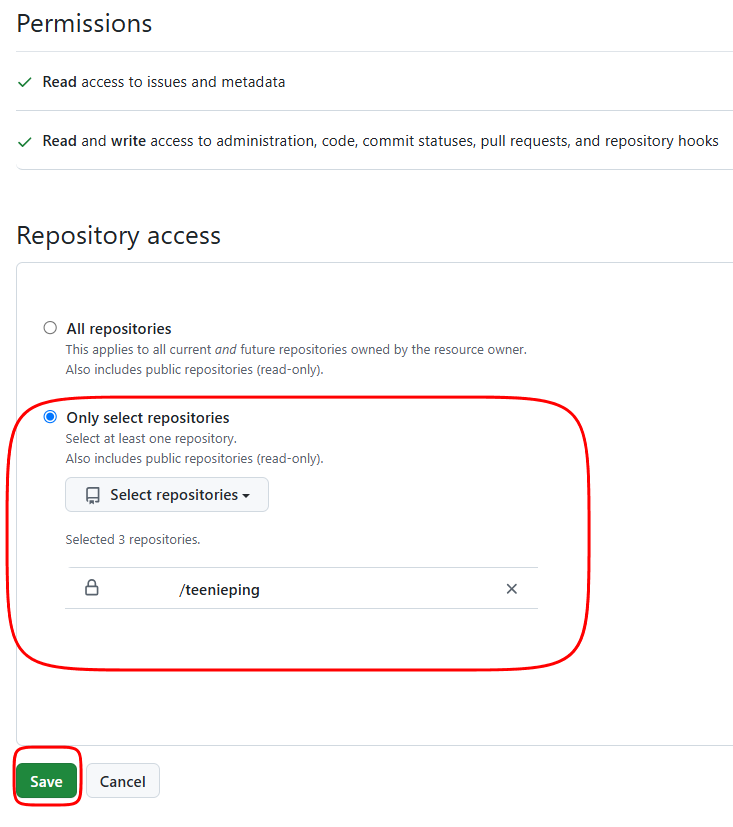
13. 레포지토리를 조회해서 선택한 후 Save 버튼을 눌러줍니다.
14. github repo정보가 조회 되면 입력 한 후 연결 버튼을 누릅니다.
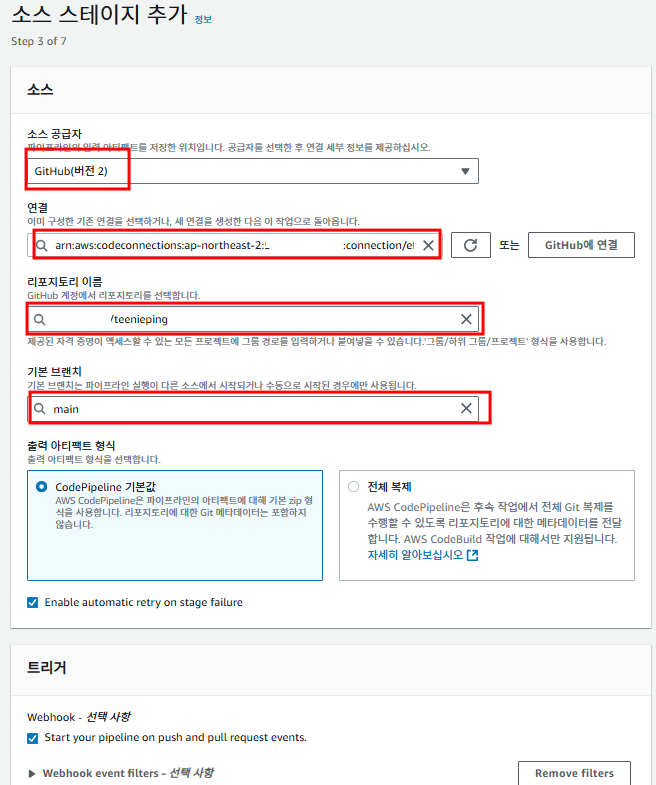
15. 레포지토리이름, 기본브랜치 main 선택한 후 다음으로 넘어 갑니다.
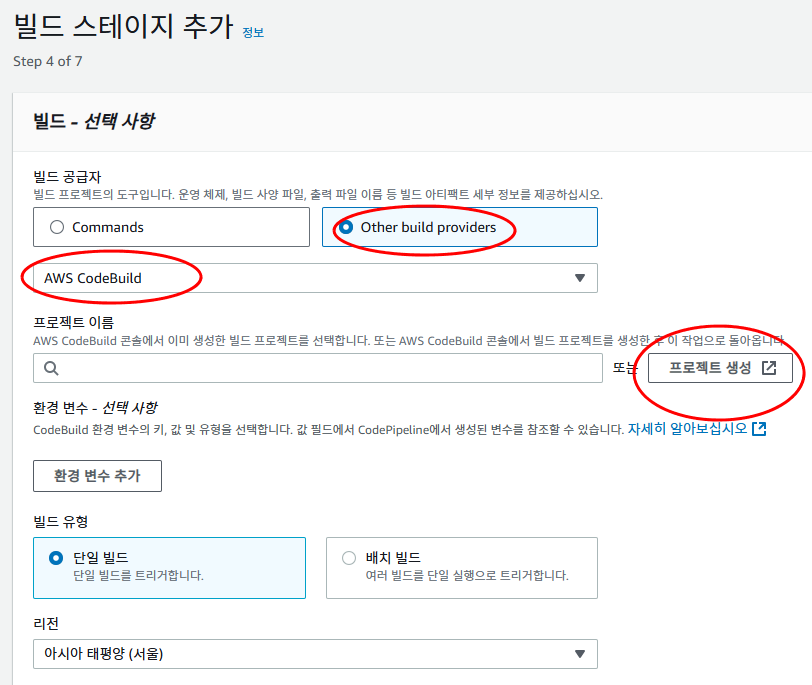
17. 빌드 스테이지 추가 부분에서 "other build provides" -> "AWS Code Build" 를 선택하고 "프로젝트 생성" 버튼을 누릅니다.
18. 프로젝트 이름, 역할 이름 입력해 줍니다.
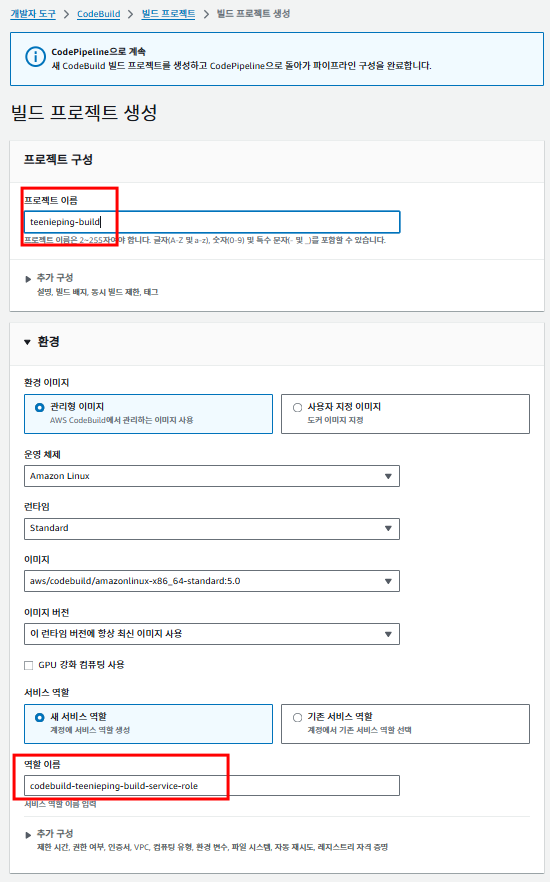
19. 추가구성에서 "권한이 있음" 부분을 활성화 해줍니다.

20. Buildspecs 부분에 입력해 줍니다.
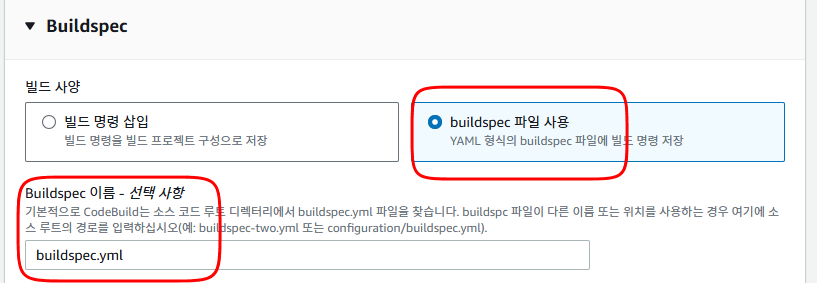
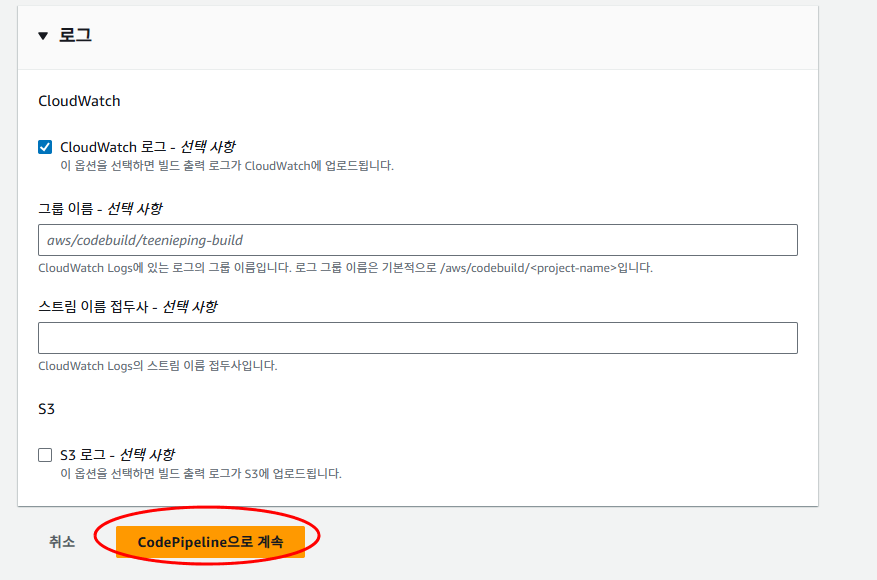
21. Codepipeline으로 계속 버튼을 눌러줍니다.
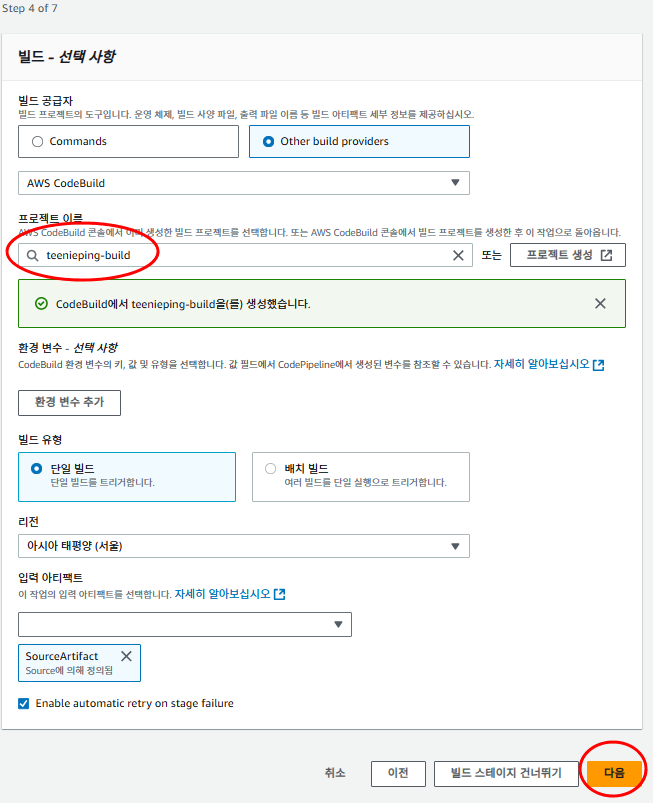
22. 생성된 프로젝트를 선택하고 다음으로 넘어갑니다.
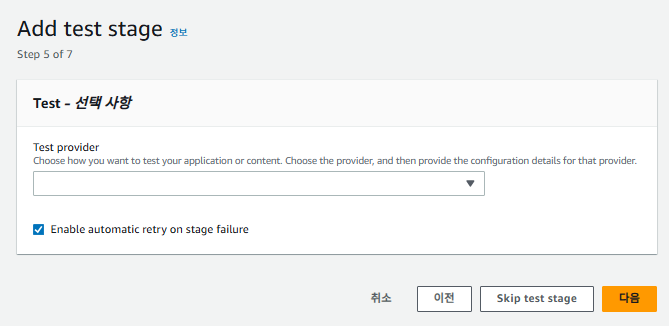
23. 테스트는 다음으로 넘어 갑니다.
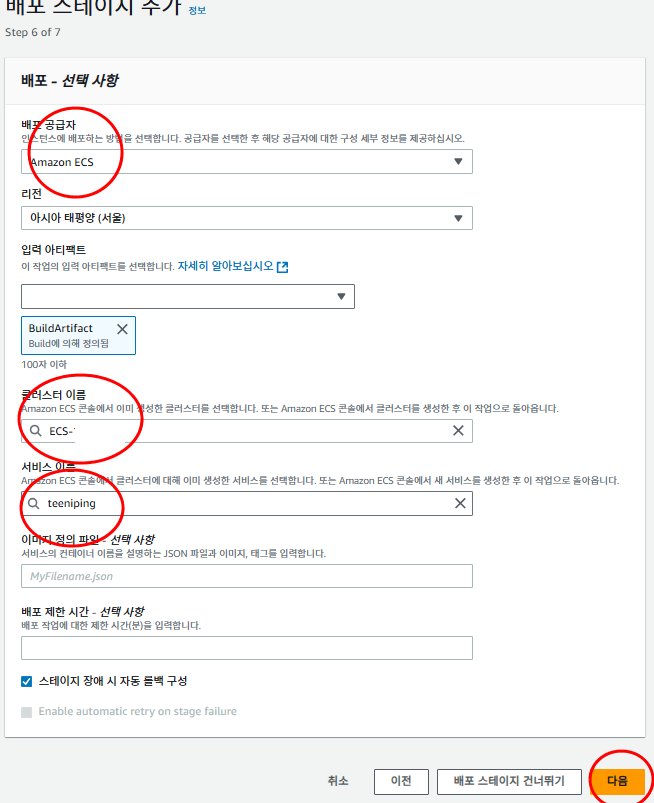
24. 배포스테이지에서 ECS클러스터와 생성된 서비스를 선택 한후 다음으로 넘어갑니다.
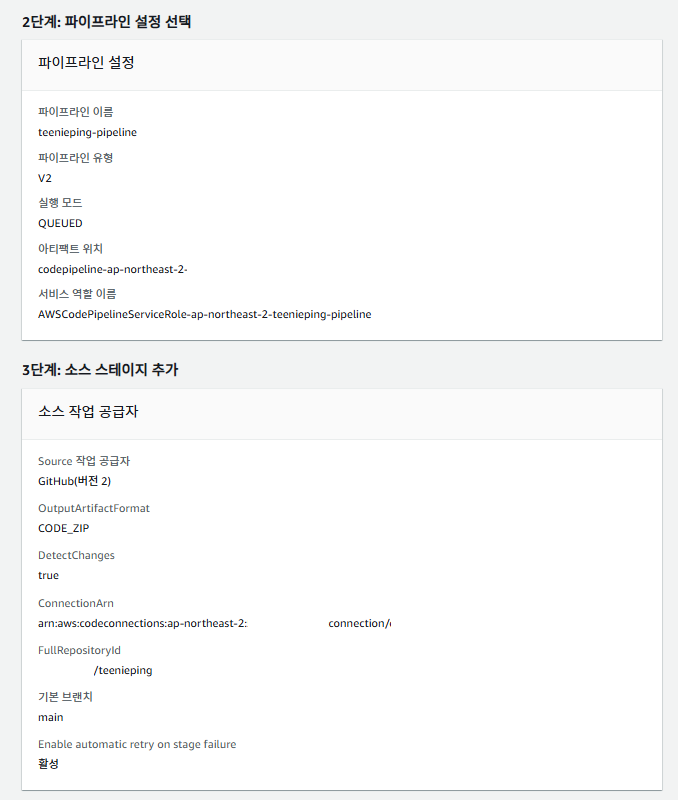
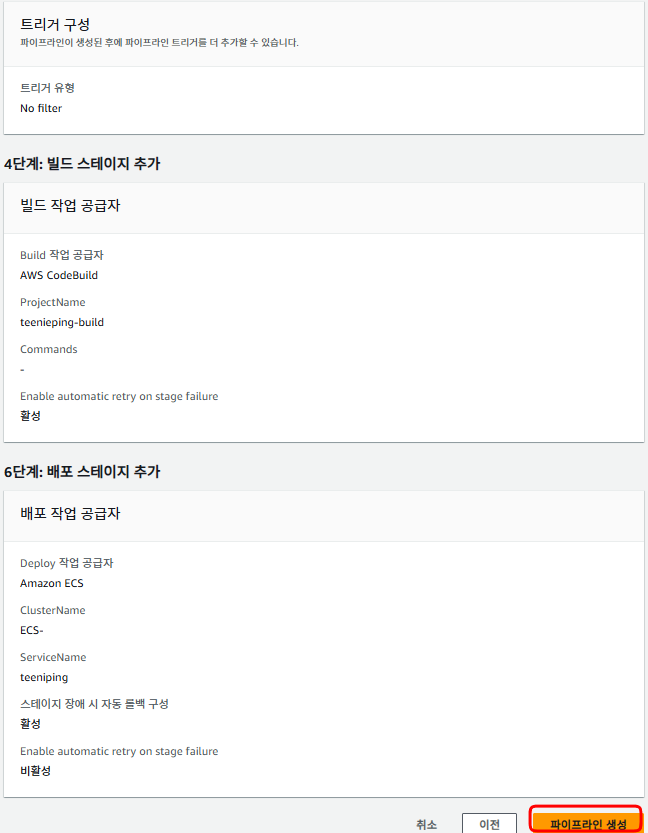
27. 설정한 정보를 확인 하고 파이프라인 생성을 누릅니다.
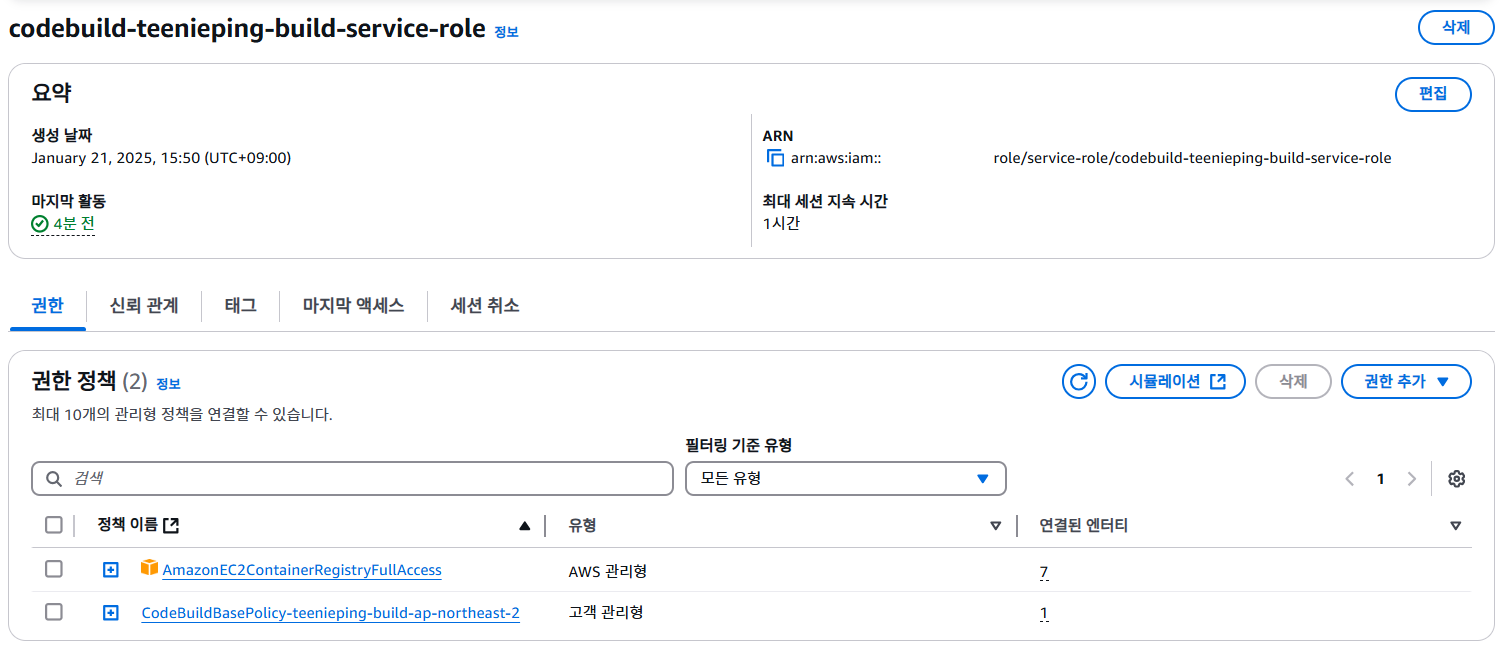
28. 그대로 돌리면 빌드에서 실패 한다.
생성된 Role에 가서 AmazonEC2ContainerRegistryFullAccess 를 추가해준다.
29. 파이프라인을 다시 돌려 본다.
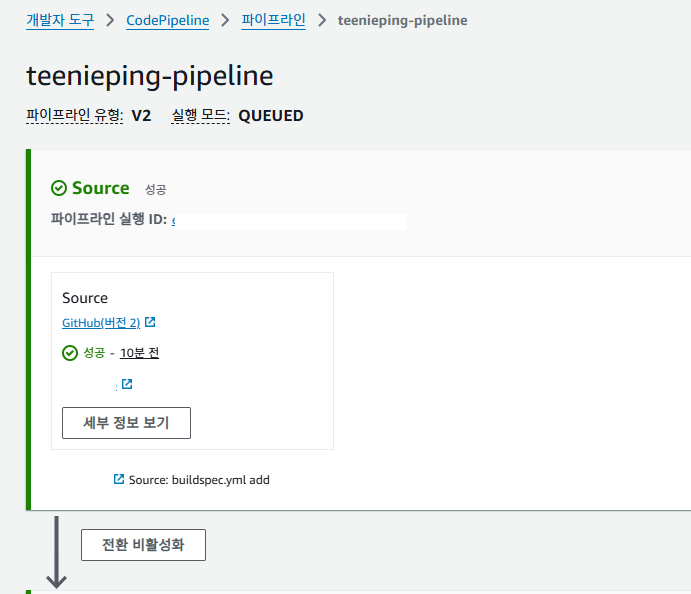
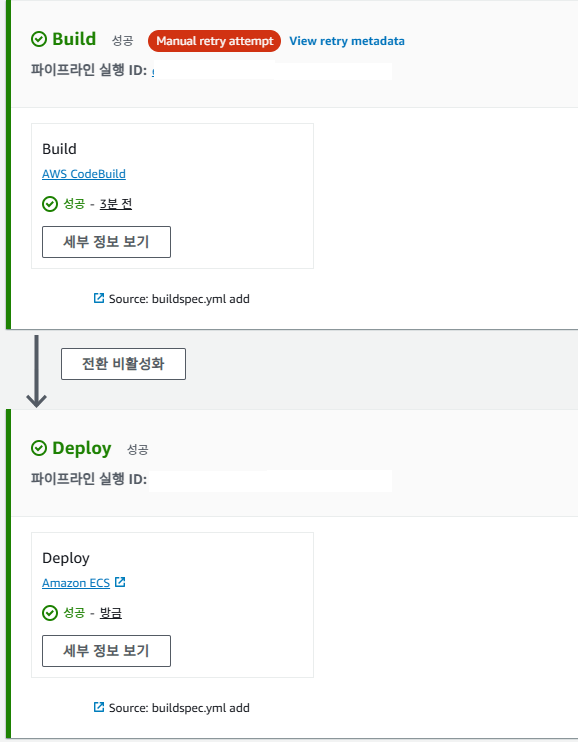
build 부분에서 권한 문제로 실패 해서 IAM 권한 추가 후 재수행시 Deploy 까지 성공 하였다.
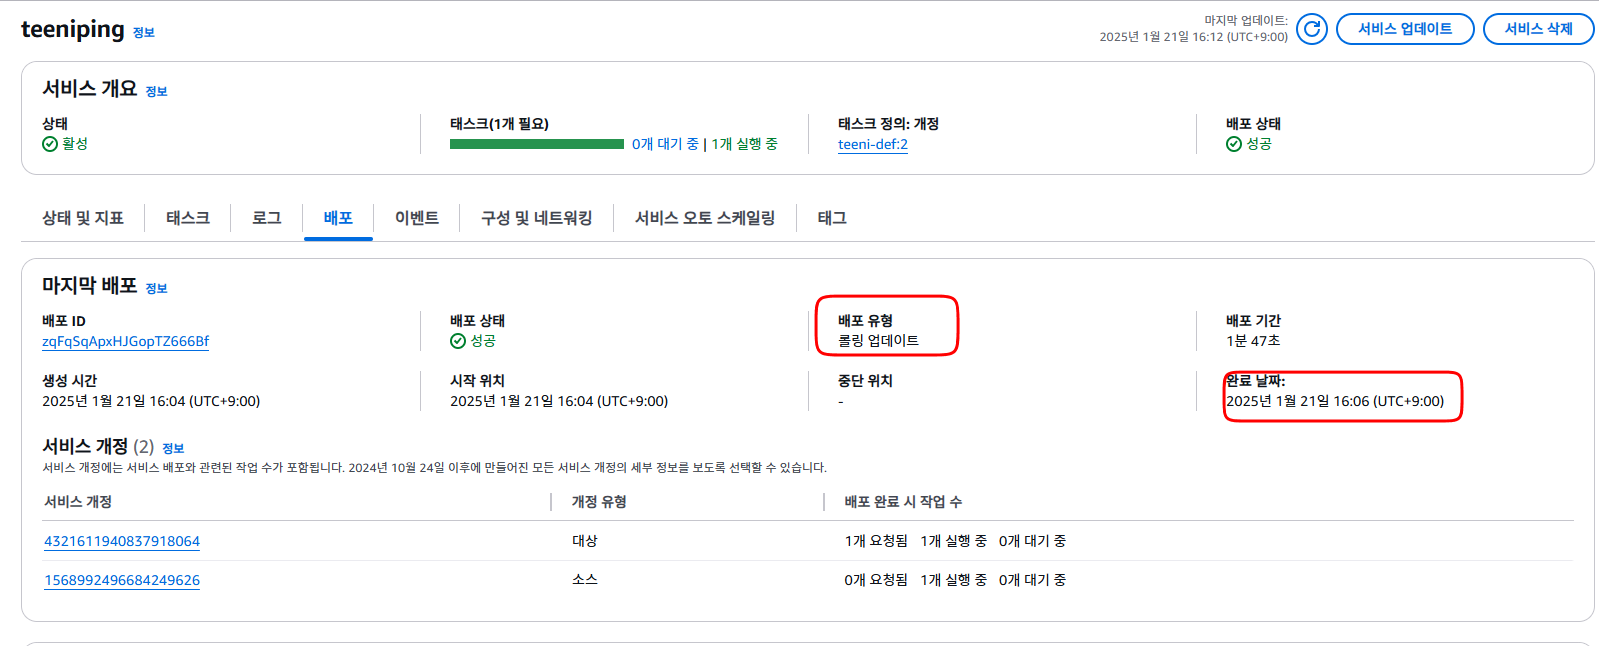
실제로 ECS에 서비스로 가보면 서비스가 재배포 되었음을 확인 할 수 있다
'Cloud > AWS' 카테고리의 다른 글
| [AWS] NLB Access log 활성화 방법 (0) | 2025.01.16 |
|---|---|
| [AWS] ECR 사용 방법 (0) | 2025.01.14 |
| [AWS] ECS 작업 배치 정의 전략(Use strategies to define Amazon ECS task placement) (0) | 2025.01.13 |
| [AWS] NLB 클라이언트 IP 보존 방법 (0) | 2024.10.31 |
| [AWS] ALB Access log 활성화 방법 (0) | 2024.09.12 |

댓글